Difference between revisions of "Strategy"
| (7 intermediate revisions by 2 users not shown) | |||
| Line 2: | Line 2: | ||
This category attempts to share insights and tips on efficient routing. | This category attempts to share insights and tips on efficient routing. | ||
=== Path Clearing === | === Path Clearing === | ||
| − | When mining a path through resources for the [[train]], it is helpful to ensure that the entire cleared route is at least 2 spaces in width so that players can move alongside the [[train]] without a bottleneck. If time allows, increasing the width to 3 spaces will allow multiple players to move back and forth instead of having to take turns. | + | When mining a path through resources for the [[train]], it is helpful to ensure that the entire cleared route is at least 2 spaces in width so that players can move alongside the [[train]] without a bottleneck. If time allows, increasing the width to 3 spaces will allow multiple players to move back and forth instead of having to take turns. To get maximum efficiency from a TNT explosion, you always want to cut in a number of squares equal to the level of TNT being placed, plus 1 additional square. For example, a LVL 3 TNT explosion would be 4 squares in and a LVL 4 (Yellow) would be 5. |
| + | |||
==Teamwork & Responsibilities== | ==Teamwork & Responsibilities== | ||
It is important to designate a single person to lay tracks because two people cannot lay tracks at the same time without causing the tracks to be double-placed or misplaced and possibly derailing the [[train]]. This can happen when one or more players are not in sync due to server latency. To have the best reaction times in situations such as waiting until the very last moment to place down the final rail or when attempting to save your train from a near derailing, it is recommended that the designated track layer be the host of the lobby as they would have the least amount of latency when laying track. | It is important to designate a single person to lay tracks because two people cannot lay tracks at the same time without causing the tracks to be double-placed or misplaced and possibly derailing the [[train]]. This can happen when one or more players are not in sync due to server latency. To have the best reaction times in situations such as waiting until the very last moment to place down the final rail or when attempting to save your train from a near derailing, it is recommended that the designated track layer be the host of the lobby as they would have the least amount of latency when laying track. | ||
| Line 8: | Line 9: | ||
The ideal team consists of three players: one on the tools, one track-layer, and one resource gatherer/dynamite user. The players can multitask but, as the [[train]] gains speed, they must focus on their own tasks. To increase efficiency, the designated track layer should pick up resources immediately after placing tracks and return to the [[train]], deposit the resources, and pick up tracks again, and continue this sequence. Those on tools can also dash directly after mining or chopping each (1) resource to shave off miliseconds travelling between resources. Cumulatively this amounts to seconds saved and allows paths to be cleared much quicker than before. This is just one example of how dashing can be very beneficial and time efficient however, keeping in mind that dashing into other players will make them drop whatever they are holding. E.g. A tool, dynamite or 1 commodity. | The ideal team consists of three players: one on the tools, one track-layer, and one resource gatherer/dynamite user. The players can multitask but, as the [[train]] gains speed, they must focus on their own tasks. To increase efficiency, the designated track layer should pick up resources immediately after placing tracks and return to the [[train]], deposit the resources, and pick up tracks again, and continue this sequence. Those on tools can also dash directly after mining or chopping each (1) resource to shave off miliseconds travelling between resources. Cumulatively this amounts to seconds saved and allows paths to be cleared much quicker than before. This is just one example of how dashing can be very beneficial and time efficient however, keeping in mind that dashing into other players will make them drop whatever they are holding. E.g. A tool, dynamite or 1 commodity. | ||
| − | == | + | == Endless Mode Wagons == |
| − | This category aims to provide guidance for when to purchase, what to purchase, and where to place your wagons, as well as other strategic guidance you might need to know. | + | This category aims to provide guidance for when to purchase, what to purchase, and where to place your [[Wagons|wagons]], as well as other strategic guidance you might need to know. |
===Purchases=== | ===Purchases=== | ||
| − | You should save up as many [[bolts]] at the beginning as possible and not spend them until [[Dynamite Wagon|Dynamite]] appears. If you have accumulated at least 7 bolts and the cart selection is not in your favor, you may purchase upgrades for the [[Crafting Wagon|Crafter]], [[Storage Wagon|Storage]] and [[Tank Wagon|Tank]], keeping in mind that you can earn up to 3 bolts per level. Below are wagon configurations from each particular difficulty that have been used to achieve the current world records. You may also notice that certain wagons are purchased in multiples. When this is done, the cost to buy the same wagon increases by 1 bolt each time to balance out the ability to purchase | + | You should save up as many [[bolts]] at the beginning as possible and not spend them until [[Dynamite Wagon|Dynamite]] appears. The 3 wagons of choice inside the shop are selected by RNG (Random Number Generator) with the chosen seed name being the main factor. If you have accumulated at least 7 bolts and the cart selection is not in your favor, you may purchase upgrades for the [[Crafting Wagon|Crafter]], [[Storage Wagon|Storage]] and [[Tank Wagon|Tank]], keeping in mind that you can earn up to 3 bolts per level. Below are wagon configurations from each particular difficulty that have been used to achieve the current world records. You may also notice that certain wagons are purchased in multiples. When this is done, the cost to buy the same wagon increases by 1 bolt each time to balance out the ability to purchase multiples with ease. The same rule applies when upgrading 2 wagons of the same level, whereas one wagon would have its upgrade cost increased by 1 bolt. The obvious choice here would be to choose the wagon upgrade of lesser cost however, upgrading both wagons incrementally wastes 2 bolts. Your team should choose one of the wagons and fully upgrade it to its LVL 3 maximum first. |
===Placement=== | ===Placement=== | ||
The world record for distance swaps the positions of the [[Tank_Wagon|Tank]] and [[Crafting Wagon|Crafter]] wagons with two [[Dynamite Wagon|Dynamite Wagons]] near the back, in front of the [[Tank Wagon|Tank]]. There are a few reasons for this: ideally, your tank of water will not need to be filled or extinguished as often as you will need to pull tracks off and place them. The tank of water can also be refilled from the engine making its default position redundant. You want a rearward water reserve allowing it to be refilled from either end of the [[train]] and your tracks as far forward as possible to allow the designated track layer to easily pull tracks off whilst refilling the [[Storage Wagon|Storage]]. Also, running to the rear of the [[train]] to pickup tracks is very inefficient and could possibly derail the [[train]] at high speeds and one-way pinches if you have not placed enough tracks ahead. You can swap wagons around as early as the completion of the first station. While in the shop, simply pickup the [[Tank Wagon|Tank]] and drop it in place of the [[Crafting_Wagon|Crafter]]. | The world record for distance swaps the positions of the [[Tank_Wagon|Tank]] and [[Crafting Wagon|Crafter]] wagons with two [[Dynamite Wagon|Dynamite Wagons]] near the back, in front of the [[Tank Wagon|Tank]]. There are a few reasons for this: ideally, your tank of water will not need to be filled or extinguished as often as you will need to pull tracks off and place them. The tank of water can also be refilled from the engine making its default position redundant. You want a rearward water reserve allowing it to be refilled from either end of the [[train]] and your tracks as far forward as possible to allow the designated track layer to easily pull tracks off whilst refilling the [[Storage Wagon|Storage]]. Also, running to the rear of the [[train]] to pickup tracks is very inefficient and could possibly derail the [[train]] at high speeds and one-way pinches if you have not placed enough tracks ahead. You can swap wagons around as early as the completion of the first station. While in the shop, simply pickup the [[Tank Wagon|Tank]] and drop it in place of the [[Crafting_Wagon|Crafter]]. | ||
| Line 21: | Line 22: | ||
{| | {| | ||
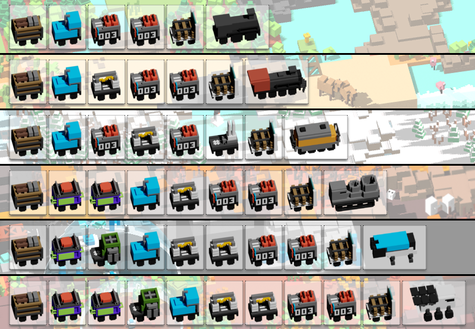
| − | |[[File:WagonPlacement_Easy_Record.png|thumb|475x475px|Wagon Placement for Easy Endless World Record | + | |[[File:WagonPlacement_Easy_Record.png|thumb|475x475px|Wagon Placement for Easy Endless World Record<br>'''10,093m:''' tama, Alto, pear, りら]] |
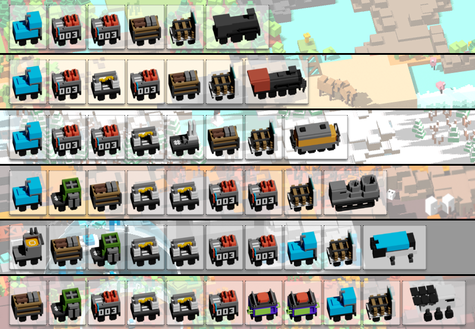
| − | |[[File:WagonPlacement_Medium_Record.png|thumb|475x475px|Wagon Placement for Medium Endless World Record | + | |[[File:WagonPlacement_Medium_Record.png|thumb|475x475px|Wagon Placement for Medium Endless World Record<br>'''10,172m:''' Sim17, Beanot]] |
|- | |- | ||
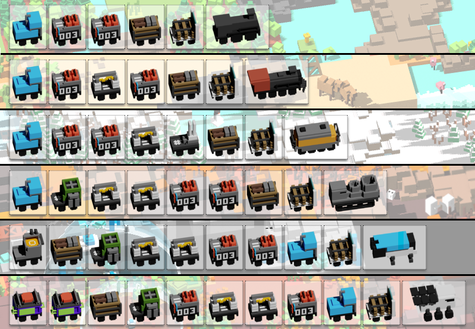
| − | |[[File:WagonPlacement_Hard_Record.png|thumb|475x475px|Wagon Placement for Hard Endless World Record: | + | |[[File:WagonPlacement_Hard_Record.png|thumb|475x475px|Wagon Placement for Hard Endless World Record<br>'''7,747m:''' Stencil, ZedME, mellohi, resetcore]] |
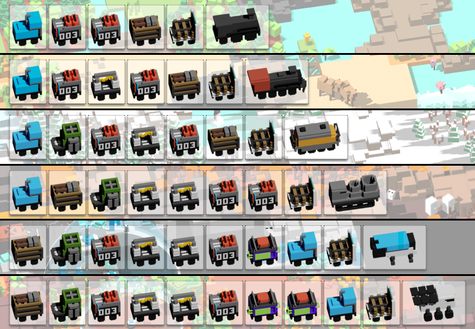
| − | |[[File:WagonPlacement_Extreme_Record.png|thumb|475x475px|Wagon Placement for Extreme Endless World Record: | + | |[[File:WagonPlacement_Extreme_Record.png|thumb|475x475px|Wagon Placement for Extreme Endless World Record<br>'''9,018m:''' Sim17, kikou]] |
|} | |} | ||
Revision as of 19:44, 17 November 2022
Track Placement
This category attempts to share insights and tips on efficient routing.
Path Clearing
When mining a path through resources for the train, it is helpful to ensure that the entire cleared route is at least 2 spaces in width so that players can move alongside the train without a bottleneck. If time allows, increasing the width to 3 spaces will allow multiple players to move back and forth instead of having to take turns. To get maximum efficiency from a TNT explosion, you always want to cut in a number of squares equal to the level of TNT being placed, plus 1 additional square. For example, a LVL 3 TNT explosion would be 4 squares in and a LVL 4 (Yellow) would be 5.
Teamwork & Responsibilities
It is important to designate a single person to lay tracks because two people cannot lay tracks at the same time without causing the tracks to be double-placed or misplaced and possibly derailing the train. This can happen when one or more players are not in sync due to server latency. To have the best reaction times in situations such as waiting until the very last moment to place down the final rail or when attempting to save your train from a near derailing, it is recommended that the designated track layer be the host of the lobby as they would have the least amount of latency when laying track.
The ideal team consists of three players: one on the tools, one track-layer, and one resource gatherer/dynamite user. The players can multitask but, as the train gains speed, they must focus on their own tasks. To increase efficiency, the designated track layer should pick up resources immediately after placing tracks and return to the train, deposit the resources, and pick up tracks again, and continue this sequence. Those on tools can also dash directly after mining or chopping each (1) resource to shave off miliseconds travelling between resources. Cumulatively this amounts to seconds saved and allows paths to be cleared much quicker than before. This is just one example of how dashing can be very beneficial and time efficient however, keeping in mind that dashing into other players will make them drop whatever they are holding. E.g. A tool, dynamite or 1 commodity.
Endless Mode Wagons
This category aims to provide guidance for when to purchase, what to purchase, and where to place your wagons, as well as other strategic guidance you might need to know.
Purchases
You should save up as many bolts at the beginning as possible and not spend them until Dynamite appears. The 3 wagons of choice inside the shop are selected by RNG (Random Number Generator) with the chosen seed name being the main factor. If you have accumulated at least 7 bolts and the cart selection is not in your favor, you may purchase upgrades for the Crafter, Storage and Tank, keeping in mind that you can earn up to 3 bolts per level. Below are wagon configurations from each particular difficulty that have been used to achieve the current world records. You may also notice that certain wagons are purchased in multiples. When this is done, the cost to buy the same wagon increases by 1 bolt each time to balance out the ability to purchase multiples with ease. The same rule applies when upgrading 2 wagons of the same level, whereas one wagon would have its upgrade cost increased by 1 bolt. The obvious choice here would be to choose the wagon upgrade of lesser cost however, upgrading both wagons incrementally wastes 2 bolts. Your team should choose one of the wagons and fully upgrade it to its LVL 3 maximum first.
Placement
The world record for distance swaps the positions of the Tank and Crafter wagons with two Dynamite Wagons near the back, in front of the Tank. There are a few reasons for this: ideally, your tank of water will not need to be filled or extinguished as often as you will need to pull tracks off and place them. The tank of water can also be refilled from the engine making its default position redundant. You want a rearward water reserve allowing it to be refilled from either end of the train and your tracks as far forward as possible to allow the designated track layer to easily pull tracks off whilst refilling the Storage. Also, running to the rear of the train to pickup tracks is very inefficient and could possibly derail the train at high speeds and one-way pinches if you have not placed enough tracks ahead. You can swap wagons around as early as the completion of the first station. While in the shop, simply pickup the Tank and drop it in place of the Crafter.
Engines & Speed
When do you buy that engine upgrade? Well, if you have an experienced team, you can push to 600-700m fairly safely in the first biome. With that being said, the world record pushes it to double that on Easy and over 1000m on Hard. Ideally, you want to avoid buying a new engine until the train is going too fast for your team. That will vary based on your team's experience level of course. You should be trying to push the speed as high as possible and feel comfortable playing at around 0.650m/s or even higher. If your team still has a surplus of tracks on the Crafter upon reaching the end of your current station, you may be able to push onwards a few more stations.
Bolts
Something to keep in mind when avoiding engine upgrades for a long time is that you don't have to worry about missions or the hidden map bolts. For example, if you are pushing really far into the first biome (Plains), you will have more bolts than you can even use by earning 1 bolt for every station successfully reached. Therefore, once you have your train maxed out, don't waste time on difficult missions or hidden bolts along the way.


